Journey Up the DSLR Astro Imaging Learning Curve
I am putting down some of the lessons I learned as I started out from scratch to
learn the INs and OUTs of DSLR Astro Imaging. Maybe this will help some folks
avoid some of the bumps in the road
SUMMER 2014 ... Starting Out
In the summer of 2014 I decided to try using my NIKON D3100 to do some basic wide angle astro imaging.
What I quickly found was that the camera had no H-alpha sensitivity. I soon learned that nearly all DSLR
cameras had the same issue. I learned that DSLRs used for astro imaging had to be modified by putting in
a special window in front of the sensor to replace the existing window. The new window allowed the camera
to be able to record H-alpha. I looked around for sources to convert the D3100 and did not find any other than
some who would replace the window with one that allowed imaging into the deep IR region of the spectrum
and I did not want IR sensitivity. The other issues that I found as I tried to work with the D3100 were also
discouraging: The D3100 was difficult to focus, the image magnification system used to focusing did an
image interpolation when you used the highest magnification. In addition I found that the RAW image
format of Nikons really was not "RAW". All in all, the experience was quite discoraging and I basically
set aside thoughts of doing DSLR Astro Imaging.
EARLY 2015 ... Starting Out ... again
In early 2015 I spent some time talking with my friend and ISP provider
Scott Rosen. He thought the whole NIKON experience had wrongly soured me
on the prospects of doing DSLR Astro Imaging. He pointed me to his own
web pages of astro images. He suggested looking at Canon Cameras and
told me about Gary Honis' DSLR conversion services.
Looking at Scott's DSLR Astro Images was really inspiring. It made me
totally reverse my thinking on the prospects of doing DSLR Astro Imaging.
I started going throught the many informative web pages at Gary Honis'
web site and eventually I started exchanges with Gary about how to best
proceed with getting a Canon and getting it converted for astro imaging.
From Gary's web pages I had decided to try to get a Canon T3i with the
600D sensor due to its low noise characteristics. I found a refurbished
600D at Canon USA's site for a very nice price and had the camera shipped
to Gary Honis to be modified for astro imaging
APRIL, MAY, JUNE 2015 ... first images
While I waited for the 600D I got myself a little IOptron Camera Tracking unit.
My best friend Robert Provin had one and it seemed like a nice way to start out.
My observatory had been locked upp years before and needed some serious work
before it would be functional. So I set up the IOptron on my deck, stuck the
D3100 on it and got some experience using it. It seemd quite well made, the wide
angle images were well tracked if the polar alignment was good and, with care,
the polar alignment scope provided could do a reasonable job.
The 600D arrived in early April and I put it on the IOptron unit and started taking
a few images. From other images that i saw around I had decided to try using an
ISO of 800. I tried focusing and found, to my pleasant surprise, that the Canon's
focusing system were quite nice. I did not need to focus on the distant Mt Pinos ridge
while it was still twilight, I could actually focus on bright stars ! The articulating
LCD view screen was a fantastic feature allowing focusing in nearly any part of the sky
without having to assume nasty positions. I bought a little $30 intervalometer that I
could set up to automatically take a series of exposures and I started tinkering to see
what the new camera could do with some wide angle shots.
So.. I started learning fast. Some of what I learned and thought of as inconvenient I
later found to be really critical.
The IOptron unit worked well with a 50mm lens so I tried it wit a 100mm lens. With the
100mm lens it was getting to be marginal and I could see the tracking erros when I stacked
images. I also found that I needed to check the polar alignment anytime I changed from
one object to another. Even though I was using a nice substantial tripod, the polar
alignment would be out of adjustment after changing the pointing to different areas of the sky.
If I had continued using the IOptron tracker I would have started to hang 20-40 pounds
of weighton the tripod just to add abit to the stability.
I found that the 600D really went thru batteries. So I bought several spares and
had them all charged as I needed to swap out the battery every couple of hours. This
was just inconvenient at this point, but it later turned out to be a mjaror problem.
I should have looked to see if the camera could be run off of an AC adapter adn bought one
as soon as I saw the problem. Getting the camera off of batteries was really a must do
sort of thing that I did not realize until later. In fact, I woud say that any camera you
are considering for astro imaging should be able to run on an external power source.
JULY 2015 ... Onto a Real Mount and a Scope
For the past month I was getting the observatory back into condition, replacing its roof and
putting on a fresh coat of stain. At the same time I was cleaning out the black widows that
had taken up residence in the observatory and all over my Losmandy GM200. Now it was time
to see if the GM200 was still functioning. I think it is quite a statement of quality that
a mount that sat out unused for 15+ years came back and was fully functionalas soon as the
power was turned on !!! The GM200 is a fantastic mount !
So it was time to get off the IOptron and away from wide angle and telphoto lenses. I put my
105mm F/6 Traveler on the GM200 and prepared to take my first exposures thru the telescope.
SEPTEMBER 2015 ...... Jumping ahead and catching up
I got the Traveler up and running.... Installed Images Plus to run some camera functions
.... Purchased a Lodestar X2 autoguider after hearing from friends about how great it was
compared to my old ST-4 units.... I installed PHD to drive the Lodestar and the GM200 and then quickly
moved to PHD2.... and I rapidly learned that 15 years of storage of my GM200 had taken a toll
... the Lithium grease had basically turned into glue.
So... moving on ... Two items have eeally come up on the CRITICAL LIST ... Implementing
CWB ( Custom White Balance ) on the converted Canon and FOCUS issues
CWB :: I seem to have missed a bit of information about the converted Canon and when
it did come to my attention it really made imaging at the scope a lot nicer. By changing the
portions of the spectrum that get thru to the sensor, the camera no longer really has any
idea about what it is looking at and images are ( in my case ) really RED when recorded.
So you take a shot of an object... and look at the screen or download the image and it is
basically red on red on red. That made it difficult to see if I had the object I was
kooking for properly positioned in the camera... Then a friend mentioned the CWB thing...
and I looked it up ... It was easy to do...just shoot an image of a grey card in daylight
lighting conditions and tell the camera you want to use a CWB and it is all done....
From that time on, images that are downloaded all bsically have a "normal" appearance.
When images are downloaded they pretty much have a "normal" color balance....
FOCUS : Focus has always been a critical issue. When using film we had built and used
the knife edge focusing technique which pretty much guaranteed crisp sharp perfect focus.
Well.. with a DSLR that's not possible without having a custom built focusing rig.
The Canon has an image magnification system that will allow one to view a 10X magnified star
image on the LCD screen and that is a real big help. ( and having an articulating LCD
screen is a real super feature on the camera .. that is not present on some Canon models )
However I still found focusing to be a hit and miss proposition. Moving to using ImagesPlus
for focusing was another big step forward... making focusing easier and producing more
reliable results ( especially if one does not have an articulating LCD screen ). However
focusing was still not a sure thing. At that point a built a simple Hartman Mask for the
Traveler and found that this simple device provided a major leap in my ability to relaibly
obtain perfect focus all the time. PS ... if you are imaging thru a filter be sure to focus
with the filter in place.
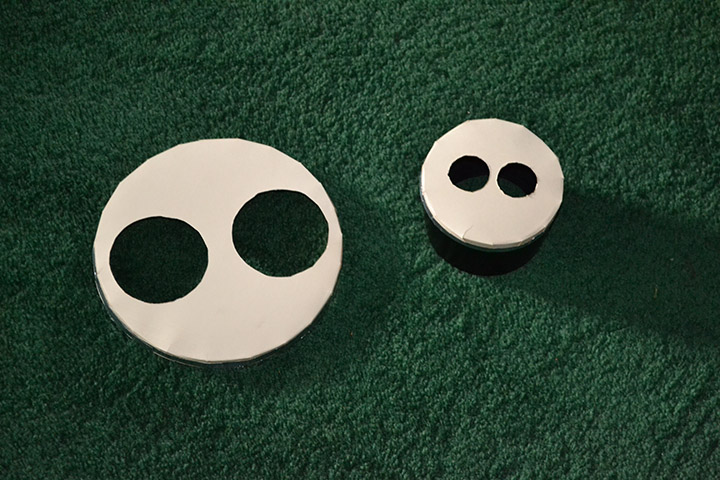
Two simple Hartman masks are shown. One is for a 155mm AP EDF and the other is for a 200mm
F/2.8 Canon lens. Both masks are made from manilla folders
When the Hartman Mask is placed in front ot the scope for focusing, one will see two star
image blobs until the scope's focus is perfect. As the scope nears the perfect focus position
the two blobs get smaller and then merge into a single tiny star image. Using Images Plus
and the LiveView mode allows one to observe a nice large 10X magnified view of the star during the
focusing process and focus is achieved quickly and easily.
**** Use a star that is not too bright ... Pick one that is just visible in the Live Focus viewer
*** Take your time ... Focusing is not easy ... but a night of unfocused images is discouraging
FOCUS Nov 2015 update: The Hartman mas was a big step forward in getting
more consistent focus. However, there are situations where it was not a satisfactory solution: I could not
check focus in the middle of a series of images without moving off the target to find a brighter star and
after trying to focus through a #29 filter I was certain that I could not use the Live View option with
an H=alpha filter. I decided that trying out a ROBO FOCUS unit was the right option.
I purchased a unit and attached it to the Traveler and began testing it. It really lets me nail in the focus
and it was fairly easy to get it up and operating. I am still working on getting to where I have some minor
issues worked out but it is really great to be able to nail the focuse consistently !
NOISE: The DSLR cameras are noisey. if you just shoot a flat field and remove the bias and stretch
the image to the extreme you sill see an image that is quite noisey. I generally shoot as ISO 800
and the name of the game is tobeat down that noise level. This can be done by stacking lots of images.
The noise will be reduce in proportion to the Square Root of the number of images stacked. So.. an image
produced by combining 9 images will have about 1/3 the noise of a single image....an image produce by
combining 64 images will have about 1/8 the noise of a single image.... as you beat down the noise level
it becomes possible to get to the fainter details of the image and enhancement of the image does not just
enhance the noise. Shooting at higher ISO values increases the noise and shooting at lowere ISO values
will reduce the noise
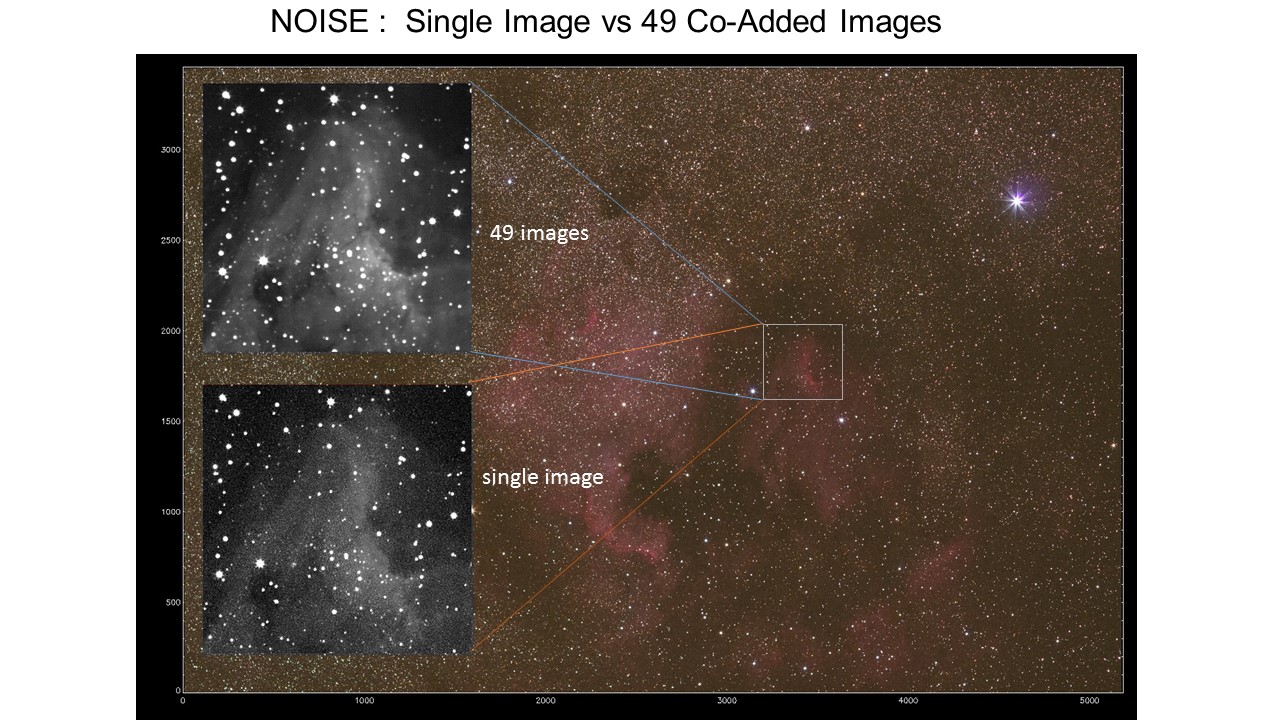
A comparison of the noise present in a single images and in an image created by co-adding 49 images
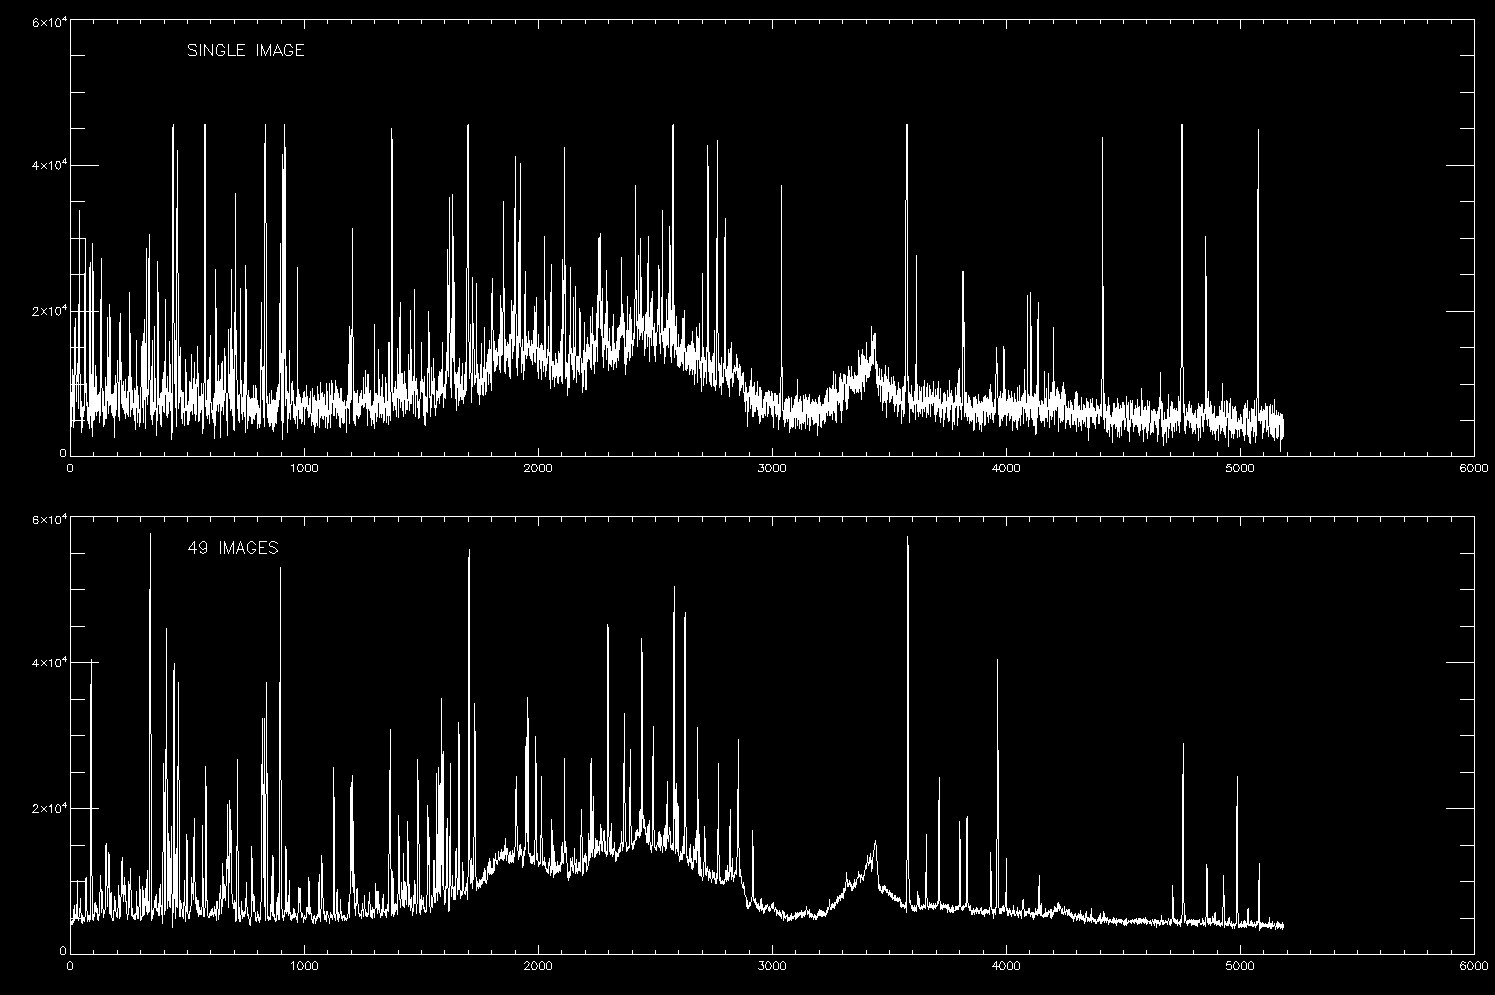
Plot show a comparison of the noise present in a single line of two images. A single image and an
image created by co-adding 49 images
October 2015 Update:
IMAGE PROCESSING : So... you have a nicely guided set of images. What Now ?? The images need some work
you are going to be happy with the final result. There are a number of programs out there that can be
used to co add the images: Images Plus, RegiStar and more. So that's for you to look at and decide.
You need to subtract out the dark noise... The noise that accumulates on the chip during any given exposure
and that is ow buried in your images. The DARK FRAMES should be taken for about the same exposure and at
various temperatures maybe at 10 F intervals. Most astro programs examine the dark frame and can adapt
a given dark fram to match reasonable variations in exposure and temperature. Since Dark Frames eat up
camera time, they can be taken on nights when you do not plan any astro imaging. I would suggest using
a dark fram that is an average of at least 10 individual exposures and more is better. You also need to do
a FLAT FIELD compensation that will remove image vignetting as well as image flaws from optics and from dust
on the sensot. Flat Field images can be taken of the sky at dusk at a time when longer exposures can be
made but not showing stars. They can be taken by placing a smooth white or grey target in front of the lens
that does not let any real image structure get to the sensor. They can be taken by spreading a white T-shirt
stretched over the front of the telescope. Exposures should be at least a few seconds long or the motion of
the shutter will affect the quality of the Flat Field. Again, many images should be averaged to make up your
working Flat Field. In order to construct a Flat Field image you will also to take BIAS Images. These are
ultra short exposures with no light that just yield the readout noise of the sensor + camera. The averaged
BIAS Frame is subtracted from the Averaged Flat Field image to form the final Flat Field Image.
You now have in hand
MAIN IMAGE an average of N images
DARK FRAME an average of X images
FLAT FIELD an average of Y images
BIAS FRAME an average of Z images
...
Subtract Dark Frame from MAIN IMAGE to remove dark noise ===>> TEMP IMAGE
Subtract BIAS FRAME from Flat Field ===>>> WORKING FLAT FIELD
The working Flat Field Image is normalized so that it's MAXIMUM is 1.000
( it can also be normalized so that the MEAN is 1.000 )
The TEMP IMAGE is then divided by the Normalized Working Flat Field Image
..... At this point your image is ready to work with ....
Again.. lots of programs are out there....I use IDL for a lot of my work
but that's just me and 30+ years of data tinkering for NASA/JPL
PHOTOSHOP is clearly one of the leading programs for doig some fairly serious
image tweking and adjusting. Photoshope Cloud costs about $10/month to keep
an alway up to date version. IMHO it is worth it .
MORE ON IMAGE PROCESSING
I use an IDL program that I wrote to do my initial image processing / prep work /
and image stacking. Once the basic image crunching is done I save the final
image as a 16-bit TIF before I take it into Photoshop to play with the image. At this
point I use Photoshop , ImagesPlus , and recently RegiStar.
In Photoshop I find several functions that I use all the time : LEVELS, CURVES,
HUE/SATURATION , COLOR BALANCE , GAUSSIAN BLUR, and UNSHARP MASK. I think these
basic functions are quite useful and it is worthwhile to get acquainted with them and
get familiar with their capabilities and limitations.
As you start to enhance images you are going to see a side effect quite soon :
STARS GET BIGGER and the image gets rather nasty looking. When this effect kicks
in you need some tool that shrinks the brighter stars. I have tried the Photoshop
Select Tool, Carboni's tools and Images Plus to do this and at tis point I think the
Images Plus star shrink tool works far better than the other options I have tried.
Eventually you are going to want to register Images from 2 or more nights of imaging
where the images from each night need to be shifted and maybe even rotated to be registered.
If you install RegiStar and usee it for this operation you will be amazed at the program's
capabilities and speed. It is stunning to watch it in action !
IMAGES PLUS is a really nice.. really amazing... powerful image processing package
available from Mike Unsold ( there is also a really neat Camera Control version of IMAGES PLUS)
The more I use IP the more impressed I am with the software.
For some instructive Image Processing Tutorials, be sure to visit Scott Rosen's site.
USING THE LODESTAR X2 WITH PHD2 : I have 2 ST-4s stashed away ... both in
working condition. I set one up and tested it out and was ready to put it to
use when 2 of my imaging friends just buried me with glowing comments about the
Lodestar X2.. we are talking GLOWING rave reviews of this autoguider that hit
all the real weaknesses of the ST-4. So.. I bought one and put my ST-4 away.
Then I installed PHD and started testing out the combo on my scope. The Lodestar X2
was just amazing and it really did meet up to the rave reviews from my friends.
Getting PHD to work was a tricky job but I quickly moved to the new PHD2 and
began using it. My mount had been left sitting in my observatory unused for
15+ years and it suffered from the effects of time. All the grease had turned
to glue and the mount was very difficult to get back into running condition.
A thorough cleaning and re-lube did the trick and then I was able to get a much
better feel for getting PHD2 to run.
First I installed a developmental version of PHD2 that had a backlash compensation
feature for DEC and I must say that is a big step forward for PHD2.
So.. in dealing with a mount that was quite tempermental... and then the fully restored
mount... I learned that the settings for PHD2 are quite dependent on the quality
of the mount and the drives. There is nothing "universal" about the PHD2 settings
Each system will respond well with a unique combination of settings. What I can say
is that with some trial and error and some fine tuning PHD2 and the Lodestar X2
are a very nice guiding system. The Lodestar X2 is really nice. I virtually never
need to make any guidescope adjustments to find a guidestar.
As far as PHD2 settings, I can suggest using fairly short exposures but not too short
(I generally use exposures of 2 - 4 seconds ) or you will be chasing seeing.
I set the aggressiveness so that I am not always overcorrecting or taking lots
of small corrections to chase a drift and my scope is well polar aligned.
December 2015 Update:
The joys of TIFF images : I was using my own IDL program to stack images
and do all the basic image processing until I discovered issues with TIFF Format images. I have not managed
to find or write a program to READ the RAW CR2 Canon Image files, so I was converting them all to TIFF
in Photoshop and then using those TIFF images in my IDL program. In Novenber 2015 I ran a few tests trying to
convert CR2 images to TIFF format using various programs and then I realized that the TIFF format was
not anything close to a RAW, untouched copy of the CR2 RAW image.
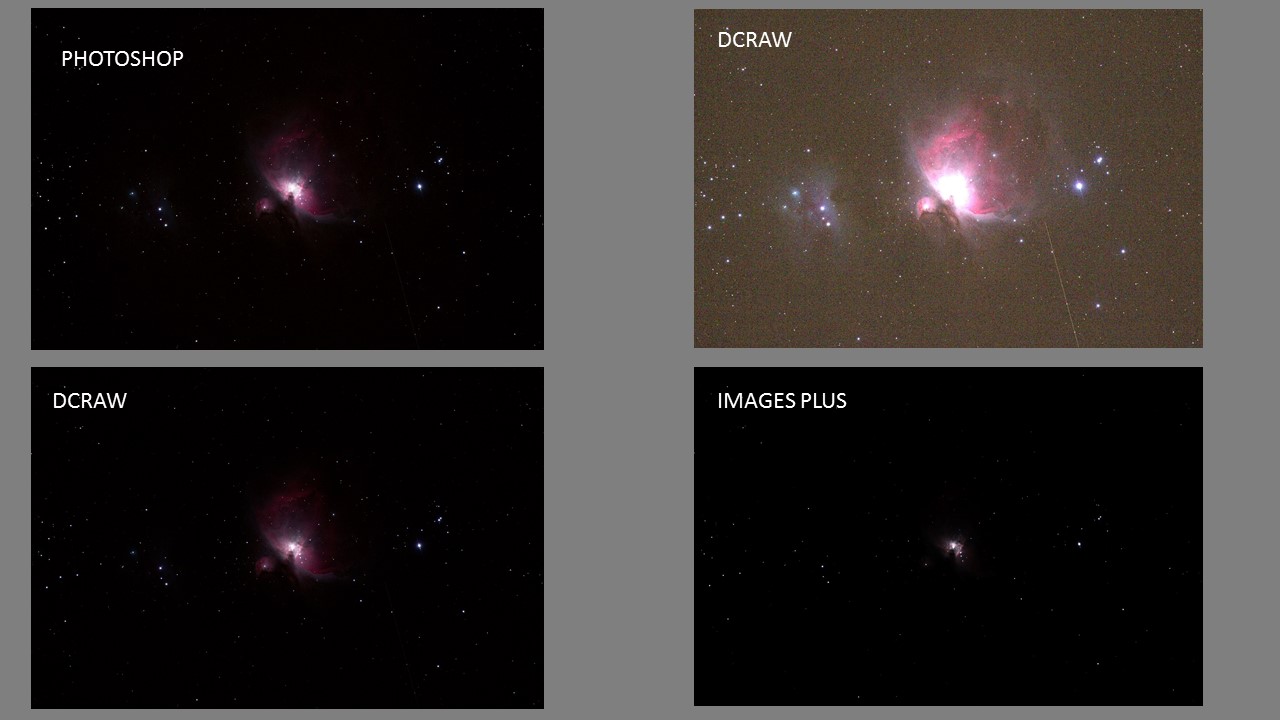
This is a comparison of 4 different programs conversions of a CR2 RAW image to a TIFF image.
The final TIFF can be varied substantially be setting flags in the conversion process.
After realizing that TIFFs were not a realiable or accurate copy of the RAW CR2 image I stopped using
my own IDL routine and moved over to using IMAGES PLUS for my image calibratin
and registration work amd have been totally impressed by the program's capabilities.
January 2016 Update:
First look at my new Canon 6D : I will be switching over to using my 155mm f/7.5
Astro-Physics EDF soon. That longer focal length really is not compatible with the smaller pixels of the 600D
so I purchased a Canon 6D and had it converted for astro use by Hap Griffin. I knew the 6D had less dark noise
than the 600D but now I could compare them side by side.
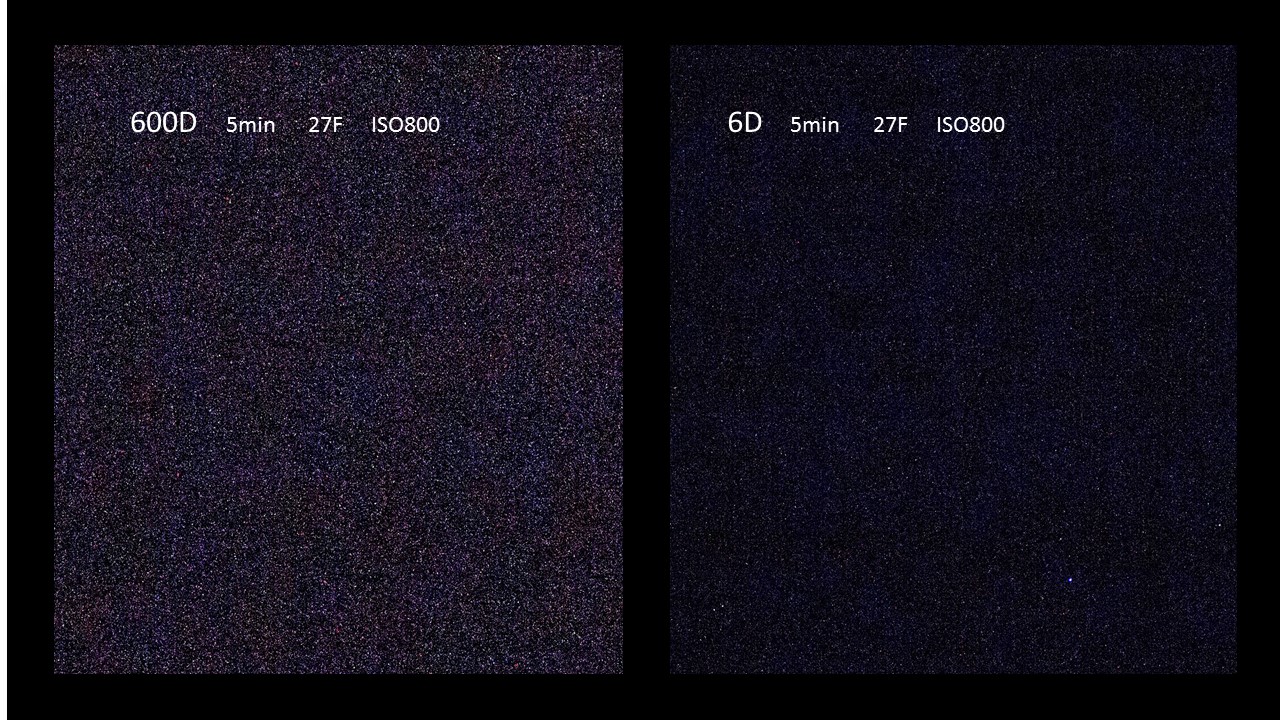
A comparison of the dark noise levels of the 600D and 6D in 5 min exposures at 27F.
This image has been super stretched to show the noise levels !!
The average noise level in the 600D is about 500DN while that of the 6D is about 300DN.
Thus the dark noise in the 6D for these exposure conditions is about 60% of the 600D.
I'm looking forward to "first light" using my AP 6-in EDF with the new Canon 6D
February 2016 Update:
Bias frames are not Universal : I switched over to using my 155mm f/7.5
Astro-Physics EDF. The slower f/ration and some faint nebulae pushed me to going to ISO 1600.
Well... I made the mistake of thinking that I would not need to redo the Bias Frames .... but ... WRONG
I could see noise in my final frames that was gone after I made a new set of BIas Frames at ISO 1600
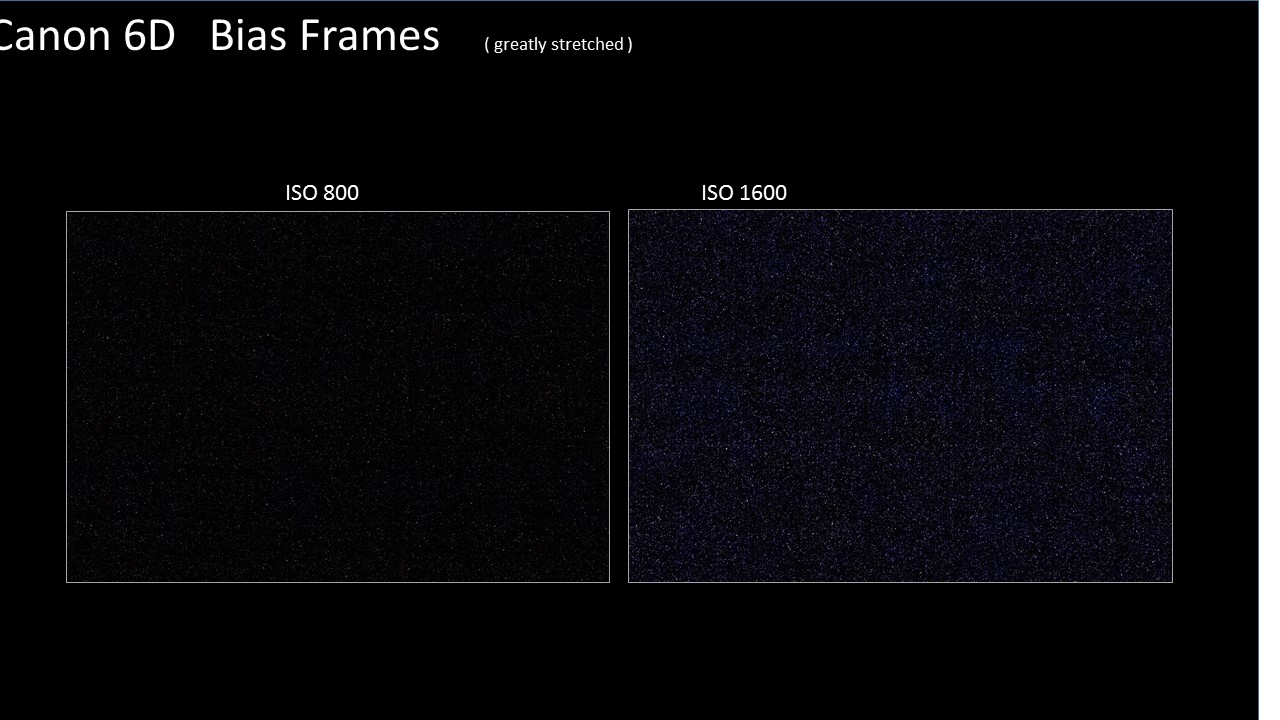
A comparison of the noise levels of the 6D at ISO 800 and ISO 1600 at 27F.
This image has been super stretched to show the noise levels !!
DRIFT ALIGNMENT is just plain SIMPLE : OK... This is nothng NEW .... but after seeing a couple
of YouTube videos that made Drift Alignment look like it was the biggest physics problem ever invented I just had to
put down something to maybe make this all look as simple as it really is.
When I first learned about Drift Alignment to improving polar alignment ( 40+ years ago ) I wrote it all down and kept it in my observing
notebook.... THEN I realized how simple it all was and never opened up that notebook ever again.
Let me put up a diagram to show how this all works.... super simple

So...looking at the Left side of the figure.... looking at a Star near the Eastern Horizon ( well... at least 10-15 deg above
the horizon ) the star is just moving along.... since getting over near the horizon removes any contribution to the drift caused
by AZIMUTHAL errors we are just looking at errors caused by ALTITUDE. SO... if the altitude of the polar axis is off the mount
will be moving along a path that makes the star seem to drift N or S in the eyepiece.... In this case the star appears to drift
to the NORTH so the Polar axis is TOO HIGH ... see... it's simple....
Now...looking at the Right side of the figure.... looking at a Star near the Meridian and up towards the zenith the star is just
moving along its path in the sky .... since getting up near the meridian removes any contribution to the drift caused
by ALTITUDE errors we are just looking at errors caused by AZIMUTH. SO... if the AZIMUTH of the polar axis is off the mount
will be moving along a path that makes the star seem to drift N or S in the eyepiece.... In this case the star appears to drift
to the NORTH so the Polar axis is TOO FAR TO THE WEST ... see... all this is really simple....
and ... since I have seen this question several times..... if you are looking in your eyepiece ... or at a graph from your guider
adn you see a star drifting North or South .... It is super simple to tell which way it is drifting by just nudging the telescope
North and South and seeing which way you have to shift the scope in order to correct the drift error
See... This is no big mystery ... it is really just plain simple !
and ... you don't need to carry this drawing around.... just use your hands .. one hand is the path of the star... th eother shows the
path that the scope is taking .... you then just SEE that the offset of the mount causes the star to appear to move North or South
APRIL 2016 I replaced my Losmandy GM200 with a new Losmandy TITAN w/ GEMINI II controller
I have only been able to use it for a few nights so far but I am very pleased with the performance. Once the Gemini has it's basic inputs
and once the mount has been calibrated for a pointing model it is really COOL to just put in an object ID and then have it APPEAR
right dead center in the camera field. The GEMINI has loads of options and capabilities. The GEMINI Site has loads of info online
and Scott Losmandy has produced a number of videos on YouTube to document most of the commonly used capabilities. For my own use I
summarized the Losmandy videos and some info from the GEMINI site and condensed them all into a PDF summary of the info contained
in each video or web site. I can refer to this out at the scope at night as I get more famailiar with the GEMINI.
GEMINI II Quick Field Guide
The Losmandy TITAN w/ GEMINI II is quite a nice mount. I was worried that it was not as solid as my
old GM200 but found that the photos on the Losmandy site made the TITAN seem smaller than it really was. When I loaded it up with my
AP 155mm f/7.5 EDF and guidescope it handled the load very well and the bearings in the TITAN made balancing into an easy task. I am
quite sure I am going to like the TITAN just as much as I did my old GM200.
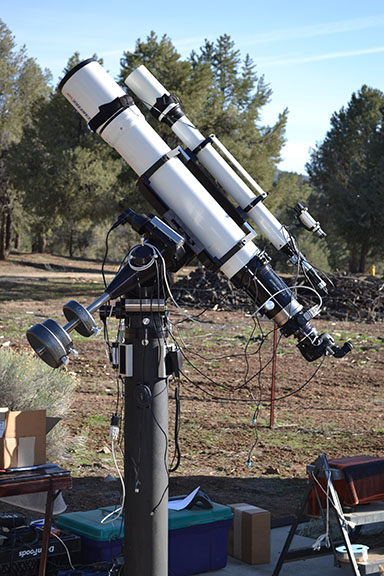
AP 155mm f/7.5 EDF w/ 3" guidescope on Losmandy TITAN at my backyard Observatory
**** UNDER CONSTRUCTION ***** to be semi-regularly updated
Return
Return to the Brad's Home Page.